
On the March to Brandywine: — Part 4 of 9
Battle of Cooch's Bridge
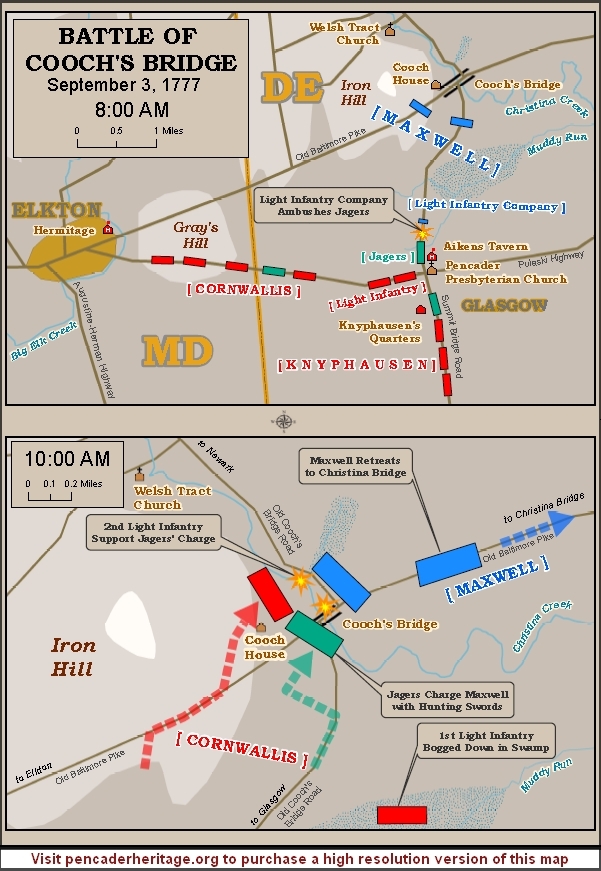
Image shared via
GNU_Free_Documentation_License,_version_1.2
American General William Maxwell had already stationed his special corps at Cooch's Bridge. He discovered that the vanguard of Cornwallis's division was now bearing down on him. Maxwell had planted troops in readiness for an ambush along either side of the road leading from Aikin's tavern. He strung his troops out for a mile below Cooch's Bridge where the thick woods of September covered him. Maxwell ordered his troops to shoot and retreat until he himself decided on a place to make a stand.
In the vanguard of Cornwallis's column was the British light infantry and two amusettes and nearly 300 Hessian and Anspach chasseurs under the command of Lieutenant Colonel Ludwig von Wurmb. Von Wurmb, writing to a friend after the battle, reported that, "about a mile beyond [Aikin's Tavern] the country was close — the woods within shot of the road frequently in front and flank and in projecting point towards the road. Here the rebels began to attack us about 9 o'clock with continued irregular fire for nearly two miles."
In short, the road was ripe for an ambush. And the silver hammers of Maxwell's musketeers came to bear upon the British.
The spirited American ambush began about two miles south of Cooch's Bridge. Mimicking tactics learned from Native Americans, the Americans hid behind trees and rocks and laid round after round into the British. Initially the British had a hard time knowing where to return fire. After taking their shots, the Americans would fall back, reload, and fire again. In this way they fell back toward Cooch's Bridge, using the familiar terrain to their advantage. Finally, near the Bridge itself the Americans "had shot themselves out of ammunition ... the fight was carried on with the sword" and bayonet. These were weapons that gave the British the advantage. In fact, the British now held several advantages:
- The British were accustomed to bayonet fighting
- Most of the American soldiers were using hunting rifles that lacked bayonettes
- The British outnumbered the Americans.
He continued, "But they immediately made a stand again and we drove them away a second time, when they took post beyond Christeen Creek at Cooch's Bridge."
Concurrently, the 2nd Battalion of British light infantry had been sent to the right across the Christiana Creek, to attempt an attack on the American left and rear.
That battalion went too deep and took itself out of the play. Blocked from action from by Purgatory Swamp, the battalion gave up its attempt at flanking and doubled back to assist the British troops engaged with Maxwell's at the Bridge. Had the 2nd Battalion been successful at flanking, Maxwell's men would have been forced to make a hasty retreat. As it was, when the British 2nd arrived back at the bridge, they found Maxwell's corps in retreat. Montresor wrote in his journal that the flight "became so precipitate that great numbers threw down their arms and blankets." Out of ammunition and facing superior numbers, it's likely that Maxwell's corps wisely hightailed it as fast as possible, leaving some arms and blankets behind, but in nowhere near the great numbers that Montresor claims.
Cooch Casualties
To add to the suspicion, a camp follower who deserted from the British shortly after the Battle of Cooch's Bridge reported that the British sent nine wagon loads of wounded to recuperate back at Head of Elk.